Well Pressure Tank: The Complete Guide for Private Well Owners
Quick Answer
A well pressure tank stores water under compressed air pressure so your pump does not have to start every time you open a faucet. Without it, the pump would cycle hundreds of times per day and fail within months. Every residential well system has one. The tank does three jobs: protects the pump from rapid cycling, maintains steady water pressure at every fixture, and absorbs pressure surges that would otherwise hammer your pipes and appliances. Most modern tanks use a rubber bladder or diaphragm to separate water from air and last 10 to 15 years. When the bladder fails, the tank waterloggs, your pump begins short cycling, and both need replacement. This guide covers everything: how tanks work, the three types, how to size one correctly, the best brands, the annual maintenance tasks you can do yourself, and how to know when the tank is failing before it takes the pump with it.
Why Your Pressure Tank Is the Most Overlooked Component in Your Well System
Most well owners think about their pump. They think about their well depth. When something goes wrong, they call a contractor and describe symptoms at the faucet. The pressure tank sits quietly in the utility room or well house, doing its job invisibly, and receives almost no attention until it fails.
This is a problem because the pressure tank is the component that determines how long the pump lasts. Every time your pump starts, it draws 5 to 7 times its normal running current in a startup surge that generates heat in the motor windings. Your pump is designed for short cycles followed by rest periods that allow that heat to dissipate. A properly sized pressure tank ensures those rest periods are long enough. An undersized, failing, or absent pressure tank removes those rest periods entirely.
The numbers are stark. A pump that would normally last 12 to 15 years under correct cycling can fail within 1 to 3 years under sustained short cycling from a waterlogged tank. The tank costs $300 to $800 to replace. The pump costs $1,000 to $2,500. This is why understanding, maintaining, and sizing your pressure tank correctly is the single highest-leverage thing you can do to protect your well investment.
How a Well Pressure Tank Works: The Full Pressure Cycle
Understanding the pressure cycle makes every other topic in this guide easier to follow. Here is what happens inside your system from the moment you open a faucet to the moment the pump shuts off.
State 1: Tank charged, pump off. The pressure tank holds water under compressed air pressure at the cut-out setpoint — typically 50 PSI (for a 30/50 system) or 60 PSI (for a 40/60 system). The compressed air inside the tank is pushing against the rubber bladder or diaphragm, which is pushing against the water side. The pump is off. You could open every faucet in the house and the water would flow from the tank with no pump running at all.
State 2: Demand begins. You open a faucet. Water flows from the tank to the faucet. As water leaves the tank, the air cushion expands, and pressure in the system drops. This is the drawdown phase. The gauge on your tank drops from 50 toward 30 PSI (on a 30/50 system). You have usable water pressure the entire time because the compressed air continues pushing water out.
State 3: Cut-in reached. When system pressure drops to the cut-in setpoint (30 PSI or 40 PSI), the pressure switch closes its contacts and starts the pump. The pump begins pushing water from the well up the drop pipe, through the check valve, and into the pressure tank.
State 4: Tank refilling. Water enters the tank, compressing the air cushion back down. Pressure climbs from cut-in back toward cut-out. If your demand matches the pump output during this phase, pressure stays steady. If your demand is lower than pump output, pressure climbs toward cut-out and the pump shuts off.
State 5: Cut-out reached. When pressure reaches cut-out, the pressure switch opens its contacts and the pump stops. The tank is fully charged again. State 1 resumes.
The key principle is Boyle's Law: pressure and volume are inversely related. As the air cushion compresses (volume decreases), pressure increases. As it expands (volume increases), pressure decreases. The rubber bladder or diaphragm keeps the air and water from mixing, because if they mixed, air would be absorbed into the water over time and the air cushion would disappear — which is exactly what happens when the bladder fails.
What the pressure gauge shows you: In a healthy system, the gauge should climb steadily from cut-in to cut-out while the pump runs, hold steady at cut-out when the pump is off and no water is being used, and drop smoothly from cut-out toward cut-in as you use water. A gauge that oscillates rapidly (pump on, off, on, off within seconds) indicates short cycling. A gauge that never rises to cut-out indicates the pump cannot build enough pressure. A gauge that holds at cut-out but the pump keeps running indicates a stuck pressure switch.
The Three Types of Well Pressure Tanks
Every residential well system uses one of three tank designs. Which type you have determines how to test it, maintain it, and what to do when it fails.
Type 1: Bladder Tanks (Most Common for Residential Wells)
A bladder tank contains a balloon-shaped rubber bladder inside the tank shell. The bladder is attached at the bottom, where the water connection enters. Water fills the inside of the bladder. Air fills the space between the bladder and the tank shell. When water enters, the bladder expands, compressing the surrounding air. When water leaves, the bladder contracts.
The bladder tank's key advantage is that the bladder fully expands to fill the tank interior during the water fill phase, giving it the highest drawdown efficiency of any tank type. A quality bladder tank provides drawdown equal to approximately 30 percent of its total volume at 30/50 pressure settings.
Many bladder tanks have a replaceable bladder accessed through a large flange at the top of the tank. If the bladder fails but the tank shell and fittings are in good condition, replacing just the bladder is sometimes practical and can save $400 to $700 compared to full tank replacement. Amtrol Well-X-Trol tanks are particularly known for bladder replaceability.
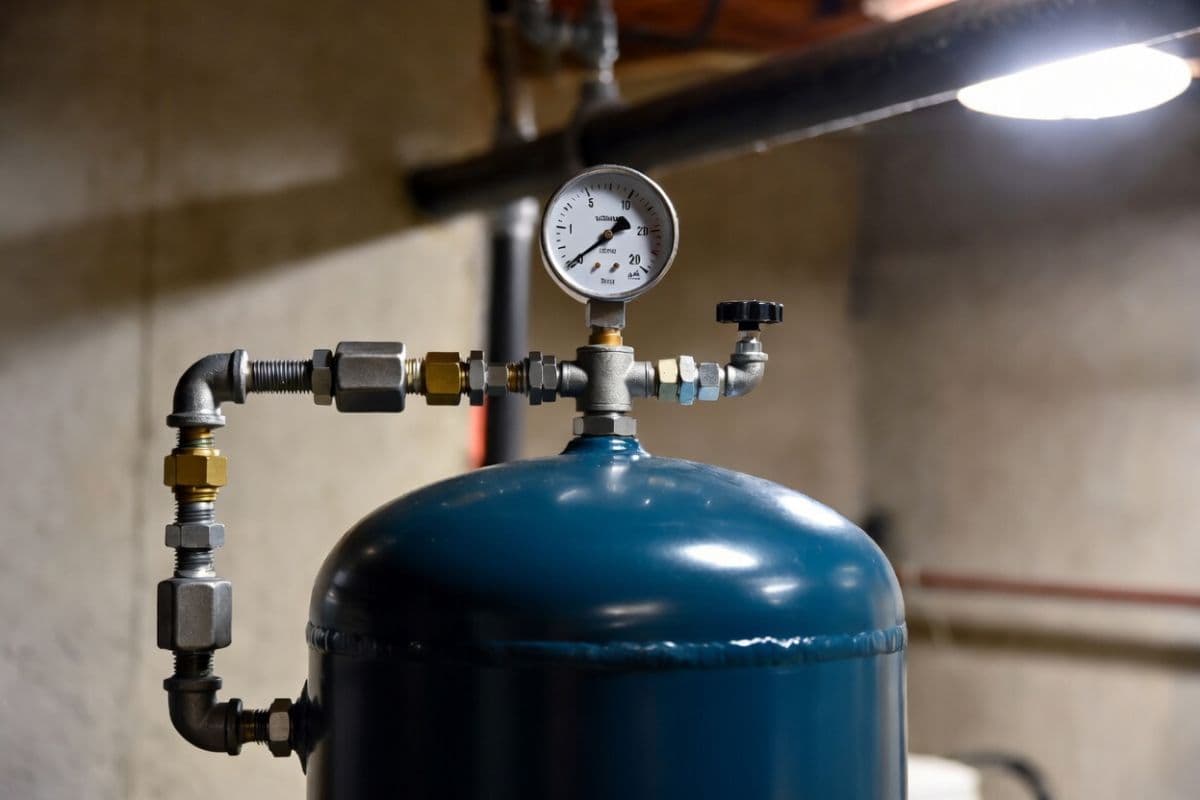
How to identify it: Bladder tanks have a Schrader valve (tire-type air valve) at the top for pre-charge testing, and a single plumbing connection at the bottom. They stand vertically or horizontally and look like a capsule or cylinder.
Pre-charge location: Air charge is in the space between the bladder exterior and the tank shell. Test it at the Schrader valve on top with the tank completely empty of water and pump off.
Failure mode: The bladder tears, develops pinholes from flex fatigue, or separates at its fittings. Water invades the air side. The tank fills completely with water. Schrader valve test shows water instead of air. Tank feels uniformly heavy. Short cycling results.
Type 2: Diaphragm Tanks
A diaphragm tank uses a flat rubber membrane permanently attached around the circumference of the tank's interior, dividing it into an upper air chamber and a lower water chamber. Unlike the balloon-shaped bladder, the diaphragm is a fixed flat membrane that flexes up and down as the water level changes.
The diaphragm design is often described as more mechanically reliable because the membrane operates in a consistent flat-to-dome flexing motion rather than expanding and contracting in all directions like a bladder. However, the diaphragm is not replaceable on most residential models — it is permanently bonded to the tank shell. If the diaphragm fails, the entire tank is replaced.
Drawdown efficiency for diaphragm tanks is approximately 25 to 40 percent of total tank volume, slightly lower than bladder tanks, because the flat diaphragm cannot deflect as far into the air chamber as a fully inflated bladder can.
Water Worker (made by Amtrol) is the most recognized residential diaphragm tank brand. Their tanks use a heavy-duty butyl rubber diaphragm rated to NSF/ANSI 61 and FDA requirements for potable water contact.
How to identify it: Diaphragm tanks look very similar to bladder tanks from the outside. They have a Schrader valve at the top and a single plumbing connection at the bottom. Many diaphragm tanks lack any external label distinguishing them from bladder tanks. Check the product literature or look for models marketed specifically as “diaphragm” design.
Pre-charge location: Air charge is in the upper chamber above the diaphragm. Test the same way as a bladder tank — Schrader valve at top with tank fully drained and pump off.
Failure mode: The diaphragm tears or separates from the tank wall. Water and air mix. Same symptoms as bladder failure: short cycling, water from Schrader valve.
Type 3: Galvanized (Air-Over-Water) Tanks
Galvanized tanks are the oldest design, still found in homes built before the 1980s. They have no membrane. Air and water share the same chamber. The air sits at the top and water at the bottom, maintained by a float-operated air volume control valve that injects small amounts of air on each pump cycle to replenish what is absorbed into the water.
Galvanized tanks require significantly more maintenance than captive-air tanks because the air charge constantly depletes as air dissolves into the water. Without the periodic air injection from the air volume control, the tank becomes waterlogged. The air volume control itself is a wear item that clogs with mineral deposits in hard water areas.
A galvanized tank is recognizable by its grey unpainted steel shell, visible seam welds, and a threaded port or plug on the side (the air inlet) in addition to the water connection at the bottom. There is no Schrader valve on top.
The content gap most articles miss about galvanized tanks: The Schrader valve test that confirms bladder or diaphragm failure does not work on galvanized tanks because there is no air valve to test. To assess a galvanized tank, you drain it completely and use an air compressor to recharge air through the side air port. If the tank repeatedly loses its air charge within days to a week, the air volume control valve has failed or the tank has internal corrosion preventing it from maintaining the air-water ratio. Galvanized tanks that cannot hold their air charge need replacement, and replacing with a modern captive-air tank is strongly recommended.
Drawdown performance: Without pre-charge, a conventional galvanized tank has a drawdown factor of only about 10 percent of total volume at 30/50 pressure settings. A 220-gallon galvanized tank is required to deliver the same drawdown as a 73-gallon captive-air tank. This explains why galvanized tanks were often enormous compared to modern bladder tanks.
The Sizing Formula: How to Know What Size Tank Your System Actually Needs
Tank sizing is the most consequential technical decision in pressure tank selection, and it is the topic where almost every homeowner article and most contractor articles provide incomplete information. Most say “bigger is better” or give a rough household size chart. This section gives you the actual formula from The Driller (the trade publication of record for the water well industry) and National Ground Water Association guidance.
The Fundamental Principle
Your pressure tank must store enough drawdown water to allow your pump to run for at least 1 minute per cycle at its rated flow rate. This 1-minute minimum is the standard recommendation from motor manufacturers to allow motor windings to reach operating temperature and begin cooling properly. Pump motors that start and stop before completing a 1-minute cycle generate heat faster than they can dissipate it. Larger tanks allow longer pump runtimes, which further extends motor life. Two to three minutes of runtime per cycle is better than one minute. There is no upper limit on tank size from an operational standpoint. The only constraints are budget and available space.
Step 1: Find Your Pump's Flow Rate in GPM
Your pump's flow rate is stamped on its nameplate or documented in the original well drilling records. If you do not have either, measure it: Time how long it takes to fill a 5-gallon bucket from a faucet with nothing else running. Divide 300 (seconds in 5 minutes) by the fill time in seconds. That is your approximate flow rate in GPM. Example: fills a 5-gallon bucket in 25 seconds. 300 / 25 = 12 GPM.
Step 2: Calculate Required Drawdown
Required drawdown = pump GPM multiplied by minimum runtime in minutes.
For pumps delivering 10 GPM or less: use 1 minute minimum runtime. For pumps delivering 10 to 20 GPM: use 1.5 minutes minimum runtime. For pumps delivering over 20 GPM: use 2 minutes minimum runtime and consider a two-tank system.
Example with 12 GPM pump at 40/60 pressure: 12 GPM x 1.5 minutes = 18 gallons required drawdown.
Step 3: Convert Drawdown to Tank Volume
Drawdown is only about 25 to 30 percent of a tank's total volume at standard residential pressure settings. This comes directly from Boyle's Law applied to the air compression ratios at 30/50 or 40/60 pressure settings.
At 30/50 PSI settings: drawdown factor is approximately 0.28 to 0.32 of total volume. At 40/60 PSI settings: drawdown factor is approximately 0.25 to 0.28 of total volume.
To find required tank volume: divide required drawdown by 0.28 (using the midpoint of the 30/50 factor, which is conservative). Example continued: 18 gallons required drawdown / 0.28 = 64 gallons minimum tank volume. The next standard size up would be an 85-gallon tank.
Important note on pressure settings and drawdown: Higher pressure settings reduce the amount of drawdown a given tank can provide. A 44-gallon tank at 30/50 settings provides about 13 gallons of drawdown. The same tank at 40/60 settings provides about 11 gallons. If you upgrade your pressure switch settings to increase household pressure, you may need to also upgrade to a larger tank to maintain the same drawdown.
The Sizing Quick Reference Table
| Pump Flow Rate | Minimum Drawdown | Pressure Setting | Minimum Tank Size |
|---|---|---|---|
| Up to 5 GPM | 5 gallons | 30/50 or 40/60 | 20-gallon tank |
| 6 to 8 GPM | 7 gallons | 30/50 | 30-gallon tank |
| 6 to 8 GPM | 7 gallons | 40/60 | 32-gallon tank |
| 9 to 12 GPM | 10 to 12 gallons | 30/50 | 44-gallon tank |
| 9 to 12 GPM | 10 to 12 gallons | 40/60 | 52-gallon tank |
| 13 to 16 GPM | 15 to 18 gallons | 30/50 | 62 to 85-gallon tank |
| 17 to 20 GPM | 20 gallons | 30/50 | 85-gallon tank |
| Over 20 GPM | 30+ gallons | 40/60 | Two-tank system |
The “bigger is better” principle: There is no operational penalty for an oversized pressure tank. A larger tank means fewer pump cycles per day, longer pump runtimes with better heat dissipation, and more stored water during power outages or pump failures. An 86-gallon tank typically costs $100 to $150 more than a 44-gallon tank. If that extra cost prevents even one pump replacement (saving $1,000 to $2,500), it pays for itself many times over.
Worked Example: Sizing a Tank for a Real Household
Scenario: A family of four in a 3-bedroom house. The well was drilled in 2015 and the original drilling report shows pump output of 10 GPM. The current pressure switch is set to 40/60. The tank being replaced is a 20-gallon bladder tank that failed after 8 years.
1. Confirm pump flow rate. The drilling report shows 10 GPM. Confirm by timing the bucket test: fills a 5-gallon bucket in 30 seconds. 300 / 30 = 10 GPM. Confirmed.
2. Calculate required drawdown. 10 GPM pump, 40/60 pressure switch. Pump is 10 GPM or less, so use 1 minute minimum runtime. Required drawdown = 10 GPM x 1 minute = 10 gallons.
3. Convert to tank volume. At 40/60 pressure settings, drawdown factor = 0.26 (slightly lower than 30/50 due to higher operating pressure). Required tank volume = 10 gallons / 0.26 = 38 gallons minimum. The next standard size up from 38 gallons is a 44-gallon tank.
4. Apply the “bigger is better” adjustment. The family had a 20-gallon tank that was almost certainly undersized for a 10 GPM pump (it provided only about 5 gallons of drawdown, meaning the pump ran for only 30 seconds per cycle instead of 60). At replacement time, the right choice is to upsize. An 86-gallon tank provides about 22 gallons of drawdown at 40/60 settings, giving the pump 2+ minutes per cycle and cutting daily cycle count nearly in half compared to the 44-gallon option. The 86-gallon tank costs approximately $80 to $120 more than the 44-gallon. Given the pump has another 7 to 10 years of service life, this is the correct choice.
5. Verify the pre-charge. New 86-gallon tank. Pressure switch is 40/60. Pre-charge must be set to 38 PSI (40 PSI cut-in minus 2). The tank ships at 38 PSI, which happens to be correct for this system — but verify with a gauge before installation because factory pre-charge can vary.
Result: Replace the undersized 20-gallon with an 86-gallon bladder tank (Amtrol WX-350 or Flexcon WR-86 or equivalent), pre-charge set to 38 PSI, installed at the same plumbing connection.
The Common Sizing Mistake: Replacing with the Same Size
When a pressure tank fails, the most common mistake is buying a replacement tank the same size as the failed tank. The failed tank may have been undersized from the original installation. A failing tank also cycles the pump more than a healthy tank, so homeowners often underestimate how much cycling was happening. At replacement time, use the formula above and size up if there is any doubt.
How to Read Your Tank's Label
Before adjusting pre-charge, replacing a tank, or calling a contractor, the label on your existing tank tells you everything you need to know. Labels vary by manufacturer but typically include these fields:
Total volume (gallons): This is the tank's total internal capacity, not the drawdown. A label reading “44 GAL” means the tank holds 44 gallons of combined air and water. Your actual drawdown is approximately 25 to 30 percent of this number.
Maximum working pressure (PSI): The maximum pressure the tank shell is rated to withstand. Almost always 100 or 150 PSI for residential tanks. This is not your operating pressure. Your system operates at 30 to 60 PSI. The rating is a safety margin.
Factory pre-charge (PSI): The air pressure at which the tank left the factory. Almost always 38 PSI regardless of manufacturer. This is why you must verify and adjust pre-charge at installation for systems running 30/50 or 20/40 settings.
Model number: Cross-reference this against the manufacturer's specification sheet to find the actual drawdown at your pressure settings. Amtrol, Flexcon, and Water Worker all publish drawdown tables for every model at 30/50 and 40/60 settings. A 44-gallon tank provides different drawdown at 30/50 versus 40/60. The label does not tell you this — the spec sheet does.
NSF/ANSI 61 certification: Indicates the internal components are certified safe for contact with potable water. Any pressure tank used for household drinking water should carry this certification. It should appear on the label.
Warranty period: A 7-year warranty (Amtrol) indicates Tier 1 construction. A 5-year warranty (Flexcon, Water Worker) indicates Tier 2. A 1 to 2-year warranty indicates a budget tank. This is sometimes the fastest way to assess what you currently have.
If the label is corroded or missing, note the tank's physical dimensions (height and diameter) and the plumbing connection size (usually 1 inch or 1.25 inch NPT). Cross-referencing these with major manufacturers' catalogs will typically identify the model or at minimum the approximate volume.
The Pre-Charge Setting: The Single Most Important Maintenance Task
Pre-charge is the air pressure inside the tank when it is completely empty of water. It is the foundation of every other aspect of tank performance.
Why it matters so much: If pre-charge is too low relative to cut-in pressure, the tank's effective drawdown is reduced even if the bladder is intact. The pump cycles more than it should. If pre-charge is set higher than cut-in pressure, the system experiences a momentary pressure drop to zero before the pump starts — a dead zone where you temporarily have no water even though the pump is about to start. This is why the 2-PSI-below-cut-in rule is not arbitrary.
The correct pre-charge for every common pressure switch setting:
| Pressure Switch Setting | Cut-in Pressure | Correct Pre-charge |
|---|---|---|
| 20/40 PSI | 20 PSI | 18 PSI |
| 30/50 PSI | 30 PSI | 28 PSI |
| 40/60 PSI | 40 PSI | 38 PSI |
| 50/70 PSI | 50 PSI | 48 PSI |
How to check and set pre-charge: Turn off the pump at the breaker. Open the lowest faucet in the house or an outdoor hose bib. Let water run until the pressure gauge reads zero and water flow stops completely. The tank must be fully empty. Press a standard tire pressure gauge against the Schrader valve on top of the tank. Note the reading. Use a bicycle pump or air compressor set to low pressure to add or release air to the correct pre-charge.
The most common mistake: Checking pre-charge with water still in the tank. Water in the tank creates back-pressure that makes the pre-charge gauge read higher than it actually is. This gives a false “correct” reading when the actual pre-charge may be significantly low. Always drain the tank completely first.
The pressure switch differential and its effect on drawdown: The differential is the gap between cut-in and cut-out pressure. Standard residential setting is 20 PSI (30/50 or 40/60). This differential is not arbitrary. Widening the differential (for example, to 30 PSI by setting a 30/60 switch) increases drawdown for a given tank because the air cushion expands further before the pump restarts. The Driller's published tables show that widening from 30/50 to 30/60 can increase drawdown by 20 to 30 percent on the same tank. However, check with your tank manufacturer before exceeding 20 PSI differential — over-expanding the water chamber can stress the bladder and reduce its service life.
Narrowing the differential (for example, a 40/50 setting with only 10 PSI gap) reduces drawdown dramatically and causes the pump to cycle frequently even with a correctly sized tank. A differential narrower than 20 PSI is almost never appropriate for residential well systems.
Adjusting the differential requires turning the large spring nut inside the pressure switch. Power must be completely off. This is a calibration task some homeowners perform, but it requires knowing what you are doing and having the correct gauge to verify the result. When in doubt, leave it at the factory setting and call a contractor if you need adjustment.
How often to check: Once per year as part of annual maintenance. More frequently if you notice increasing pump cycling frequency. A pre-charge that drops significantly from one annual check to the next indicates the Schrader valve itself is leaking (easily fixed with a new valve core, $2) or, more seriously, that air is leaking through the bladder into the water side, which means the bladder is developing pinhole failures and tank replacement is coming.
The Best Pressure Tank Brands
Residential pressure tanks range from excellent to disposable. Brand choice matters considerably more than most homeowners realize because all tanks look similar from the outside.
Tier 1: Amtrol Well-X-Trol
Amtrol invented the modern pre-pressurized captive-air well tank in 1946. The Well-X-Trol line has been the contractor standard for nearly 80 years. Key specifications: deep-drawn seamless steel shell rated to 150 PSI working pressure, heavy-duty butyl diaphragm, patented Turbulator water circulation device that prevents stagnation, antimicrobial interior liner that neutralizes bacteria on contact, welded stainless steel air stem (no thread seal to fail), and a 7-year limited warranty (the longest in the residential segment). Well-X-Trol bladders are notably thicker and more durable than most competitors, typically lasting 2 to 3 years longer in independent contractor comparisons. Premium pricing: approximately 20 to 30 percent more than comparable Flexcon or Water Worker models.
Tier 1: Flexcon WR Series
Flexcon is the primary competitor to Amtrol in the professional contractor market. Flexcon uses computer-aided design (CAD) technology to engineer a controlled-action diaphragm system that flexes uniformly rather than developing stress concentrations at fixed points. All Flexcon tanks undergo seam-weld testing, high-pressure testing, and helium leak testing before leaving the factory. The WR series is designed specifically for well water applications and includes a 5-year warranty. Drawdown performance is comparable to Well-X-Trol. Pricing is typically 10 to 20 percent lower than Amtrol.
Tier 2: Water Worker
Water Worker is manufactured by Amtrol (same factory, same parent company) and is sold primarily through home improvement retailers at a lower price point than the Well-X-Trol line. Construction is similar but with a thinner diaphragm and slightly lower working pressure rating. The 5-year warranty (versus 7 years for Well-X-Trol) reflects this difference. For most residential applications in areas with normal water chemistry, Water Worker tanks perform well for their price point. The caveat is that some inconsistency in factory pre-charge has been reported — always verify pre-charge with a gauge before installation.
Tier 2: Goulds V-Series
Goulds (owned by Xylem) produces the V-Series pressure tanks specifically designed to pair with Goulds pump systems. These are quality contractor-grade tanks with good performance and a 5-year warranty. Recommended if your well system uses a Goulds pump and you want matched components from the same manufacturer.
Tier 3: Budget brands (Flotec, Red Lion, generic)
Budget tanks work but have thinner bladder material, lower-grade fittings, and shorter warranties (often 1 to 2 years). In areas with aggressive water chemistry (low pH, high minerals, high chlorine), budget tanks often fail within 3 to 5 years. The price difference between a Flotec and a Water Worker is typically $50 to $80 for a comparable size. The life expectancy difference can be 5 to 7 years. On an annual cost basis, the premium tank almost always wins.
Brand recommendation: For most residential wells, buy the largest Amtrol Well-X-Trol or Flexcon WR that fits your space and budget. The lifespan, warranty, and contractor support justify the premium. If budget is the primary constraint, Water Worker is the logical step down. Avoid Tier 3 tanks for primary residential systems.
Annual Maintenance: What You Can Do Yourself
Pressure tank maintenance takes about 15 minutes per year. Most of it requires no tools beyond a tire pressure gauge. Doing these tasks annually extends tank life and catches problems before they become emergencies.
The EPA's private wells program at epa.gov/privatewells recommends annual professional well system inspections. The tasks below are the homeowner's contribution to that annual maintenance cycle — they take 15 minutes and cost nothing beyond a $5 tire gauge.
Task 1: Annual pre-charge check (10 minutes)
As described above: pump off, tank fully drained, check Schrader valve with tire gauge. Verify reading matches correct pre-charge for your pressure switch setting (always 2 PSI below cut-in). Add or release air as needed. Record the date and reading.
If pre-charge is correct but cycling is increasing: the bladder may be developing pinhole leaks that are allowing slow air absorption. Watch carefully over the next few months. If pre-charge drops significantly before the next annual check, bladder failure is in progress.
Task 2: Visual inspection for corrosion (2 minutes)
Look at the exterior of the tank shell, particularly the bottom where condensation collects. Surface rust that you can wipe off is cosmetic. Rust that you can penetrate with a fingernail or that has created pits in the metal is structural corrosion indicating the tank shell is failing. A tank with structural shell corrosion should be replaced regardless of whether the bladder is still functional, because a pressurized tank with a corroded shell can rupture.
Also inspect the plumbing fittings at the tank connection point. Mineral deposits, staining, or weeping at threads indicate a slow leak that will worsen.
Task 3: Check the pressure gauge accuracy (2 minutes)
Compare your tank's gauge reading to a second gauge (a tire gauge attached to the Schrader valve when the tank is pressurized gives a rough comparison). A gauge that reads 10 or more PSI off is a failed gauge. Well system gauges are inexpensive ($10 to $25) and are easily replaced. A bad gauge can lead you to believe your system is at the correct pressure when it is not, masking developing problems.
Task 4: Listen to the pump cycling pattern (1 minute)
With no water running in the house, listen at the pressure switch. Silence means the system is holding pressure (good). A click-hum-click pattern repeating every few seconds means the pump is short cycling (bad). A continuous hum with no shutoff means the pump is running constantly (bad). Either pattern requires immediate investigation. A single short cycle when you open and close a faucet quickly is normal. Repeated unprompted cycling with no demand is not.
Signs Your Pressure Tank Is Failing
Pressure tank failure is rarely sudden. In most cases, symptoms develop gradually over weeks or months. The earlier you catch them, the more likely you are to replace the tank before it damages the pump.
Increasing pump cycle frequency. If you notice the pump clicking on more often than it used to — especially for small demands like flushing a toilet or running water briefly — the tank's effective drawdown is shrinking. This can indicate a slowly failing bladder or a leaking pre-charge. Check the pre-charge first. If it is correct, the bladder is losing its separation and water is mixing with the air side.
Water from the Schrader valve. Press the center pin of the Schrader valve on top of the tank with the pump off. Air should come out. If water sprays out, the bladder has failed and the tank is waterlogged. This is the single most definitive test for bladder failure.
The tank sounds solid when tapped. A healthy tank sounds hollow in the upper half (compressed air) and solid in the lower half (water). A tank that sounds uniformly solid from top to bottom is completely waterlogged. The air cushion is gone. The pump is cycling on every demand.
Pressure fluctuations during use. If water pressure surges and drops noticeably during a shower or while filling a sink, the tank may be losing its buffering capacity. This is different from the normal slight pressure variation during a pump cycle — it is a more dramatic fluctuation that feels like someone is turning the water on and off.
Visible exterior rust or weeping at fittings. Structural corrosion on the tank shell or active leaking at the plumbing connection means the tank is near end of life even if the bladder still works. Do not wait for a bladder failure to replace a structurally compromised tank.
The tank feels abnormally heavy. When drained and depressurized, a healthy tank should be light enough to rock or tilt easily. A waterlogged tank is full of water and feels like it weighs 200+ pounds. If you cannot budge a drained tank, it is waterlogged.
When to Replace vs. Repair
Replace the bladder only if: The tank is a bladder-type model with a replaceable bladder (check manufacturer documentation). The tank shell has no corrosion, no weeping at fittings, and no visible damage. The tank is less than 10 years old. A replacement bladder for your model is available. Bladder replacement typically saves $400 to $700 compared to full tank replacement and takes a qualified person about an hour.
Replace the entire tank if: The diaphragm has failed (not replaceable on most models). The tank shell has structural corrosion. The tank is over 12 to 15 years old. The Schrader valve stem is corroded into the shell and cannot be replaced. The tank was undersized originally — replacement is the opportunity to upsize. The cost difference between a bladder replacement and a new tank is less than $200 (which is common for smaller tanks).
Never repair a galvanized tank. If you still have a galvanized (air-over-water) tank and it has failed, replace it with a modern captive-air tank. The labor cost to troubleshoot and repair an aging galvanized system almost always exceeds the cost of a new bladder or diaphragm tank, and the new tank will perform dramatically better with virtually no maintenance.
Pressure Tank and Water Hammer: The Connection Most Homeowners Miss
Water hammer is the banging or clanking sound you sometimes hear when a pump starts, a faucet shuts quickly, or a washing machine valve closes. It is caused by the sudden stop or change in direction of a moving water column. In well systems, the pressure tank plays a critical role in preventing water hammer because the compressed air cushion absorbs the pressure spike that occurs when the pump starts.
When the pressure tank is properly charged, the pump starting adds water pressure gradually against a compressible air cushion. The pressure rise is smooth. When the tank is waterlogged, there is no air cushion. The pump's output pressure hits the plumbing system as a nearly instantaneous shock. This hydraulic shock can momentarily exceed 10 times normal operating pressure, according to testing data from FreshWater Systems, which measures the phenomenon.
If you are hearing water hammer that did not exist before, and your pump is cycling normally, it almost certainly indicates the pre-charge has dropped significantly. Check it. If the hammer started when you replaced a pump but not before, the new pump may have a higher output pressure than the old one, requiring a recalibrated pre-charge. If the hammer persists with correct pre-charge, the tank may be undersized for the pump.
The downstream consequences of chronic water hammer: premature failure of check valves and ball valves, leaking pipe fittings at stress points, damage to appliance inlet connections (especially washing machines and dishwashers), and accelerated wear on the pump itself.
Water Treatment Equipment and Pressure Tank Sizing
If your well system includes any water treatment equipment, your effective demand on the pressure tank is higher than household water use alone suggests. This is a content gap in almost every pressure tank sizing guide.
Backwashing iron filters and softeners. Iron filters and water softeners periodically go through a backwash regeneration cycle, typically timed for 2 to 4 AM to avoid disrupting household use. During backwash, the system draws water at 2 to 5 GPM continuously for 30 to 60 minutes. This sustained overnight demand cycles the pump repeatedly and is the most common reason a correctly sized pressure tank still shows unexplained pump cycling overnight. If your pump cycles every 10 to 20 minutes between midnight and 4 AM, check whether a water treatment regeneration cycle coincides. Oversizing the pressure tank by one size when treatment equipment is present is a practical approach.
Reverse osmosis systems. RO systems produce water slowly (typically 0.2 to 1 GPM) through a continuous membrane process. The RO unit's storage tank refills constantly from the pressure side of your well system, creating a small but sustained low-level demand. An RO system alone rarely causes short cycling, but it does mean your pump never achieves truly zero demand even when the household appears idle. Factor an additional 0.5 to 1 GPM into your effective demand calculation when sizing your pressure tank if you have an RO system.
UV disinfection and sediment filters. UV units and cartridge filters do not create additional water demand, but sediment filters that become restricted over time increase the pressure drop the pump must overcome, effectively reducing the pump's output rate and requiring the pump to run longer to fill the tank. A clogged sediment filter can mimic the symptoms of an undersized pressure tank. If you experience increasing cycle frequency with clean water and a healthy bladder, check your filter cartridge.
Pressure Tank for Low-Yield Wells: Special Considerations
A well that produces less than 2 to 3 gallons per minute cannot sustain continuous pump operation during periods of moderate household demand. This creates a specific pressure tank challenge: you cannot simply size the tank for the pump's output and call it done, because the pump may draw the well down faster than the aquifer can recharge.
For low-yield wells, the solution is a two-component system: a larger-than-normal pressure tank (86 gallons or more) that provides extended storage, combined with a pump cycle controller that limits pump runtime to prevent well drawdown. The pressure tank acts as both a hydraulic buffer and a short-term water reservoir that sustains the household while the well recharges between pump cycles.
Some low-yield systems use a submersible storage cistern — a large buried tank that the well pump fills slowly, with a separate booster pump drawing from the cistern to supply the house. This eliminates the cycle concerns entirely by decoupling the well's recharge rate from the household's demand pattern.
If your well yield is below 2 GPM and you are experiencing consistent pressure loss during morning demand peaks, talk to a well contractor specifically about low-yield well solutions rather than simply replacing or upsizing the pressure tank.
Frequently Asked Questions
What does a well pressure tank do?
A pressure tank stores water under compressed air pressure so your pump does not have to start every time you open a faucet or flush a toilet. It maintains steady water pressure at every fixture, protects the pump from the wear of rapid cycling by providing a rest period between pump cycles, and absorbs pressure surges that would otherwise cause water hammer. A well system without a functioning pressure tank would cycle the pump hundreds of times per day, destroying it within months.
How long does a well pressure tank last?
A quality bladder tank from a reputable manufacturer (Amtrol Well-X-Trol or Flexcon) lasts 10 to 15 years under normal conditions, with some premium tanks reaching 15 to 20 years. Budget tanks typically last 5 to 8 years. Water chemistry significantly affects lifespan: acidic water (pH below 6.5), high chlorine concentration, elevated manganese, and water treated with hydrogen peroxide for iron removal all accelerate rubber bladder degradation. Consistent short cycling also shortens bladder life through repeated pressure spikes and mechanical stress on the rubber membrane.
What size well pressure tank do I need?
Required drawdown (gallons) equals pump GPM multiplied by 1 minute minimum runtime. Required tank volume equals required drawdown divided by 0.28 (for 30/50 settings) or 0.25 (for 40/60 settings). A 10 GPM pump at 30/50 settings needs 10 gallons drawdown, which requires a minimum 36-gallon tank (10 / 0.28). In practice, buying the next size up is always recommended. Most 3 to 4 bedroom homes with 8 to 12 GPM pumps do well with a 44 to 86-gallon tank.
What is the correct pre-charge pressure for a well pressure tank?
Pre-charge should always be set to 2 PSI below the pump's cut-in pressure, measured with the tank completely empty of water and the pump off. For a 30/50 pressure switch, the correct pre-charge is 28 PSI. For a 40/60 switch, 38 PSI. For a 20/40 switch, 18 PSI. Tanks ship from the factory pre-charged at 38 PSI regardless of system settings. Verify and adjust to your system's correct setting during installation and annually thereafter.
How do I know if my pressure tank bladder has failed?
Three tests confirm bladder failure. First: press the Schrader valve center pin on top of the tank with the pump off. If water sprays out instead of air, the bladder has failed. Second: tap the tank from top to bottom with a knuckle. A healthy tank sounds hollow at the top and solid at the bottom. A waterlogged tank sounds uniformly solid throughout. Third: try to rock the tank when drained. A waterlogged tank feels abnormally heavy and barely moves. Any of these tests confirming failure means the tank needs replacement.
Can I replace just the bladder, or do I need a whole new tank?
On many quality bladder tanks (particularly Amtrol Well-X-Trol models), the bladder can be replaced separately if the tank shell and fittings are in good condition and the tank is less than 10 years old. Bladder replacement saves $400 to $700 compared to full tank replacement. On diaphragm tanks (including most Water Worker models) and on galvanized tanks, the membrane is not replaceable and the entire tank must be replaced. Check your model's documentation to determine replaceability.
What is the difference between a bladder tank and a diaphragm tank?
A bladder tank uses a balloon-shaped rubber membrane inside the tank that expands to fill the tank interior as water enters. A diaphragm tank uses a flat rubber membrane permanently bonded around the tank's circumference that flexes up and down. Bladder tanks generally offer slightly higher drawdown efficiency and many models allow bladder replacement. Diaphragm tanks are often more compact and the flat membrane operates in a consistent, repeatable motion some manufacturers believe produces less localized stress. For most residential well applications, either type performs well. Amtrol Well-X-Trol uses a diaphragm design; Flexcon WR uses a bladder design.
Does pressure tank size affect water pressure?
Tank size does not affect the operating pressure of your water. Operating pressure is set by the pressure switch cut-in and cut-out settings. What tank size does affect is how stable pressure feels during use. A larger tank provides more stored drawdown water, so pressure drops more slowly as you use water. A small tank empties quickly, causing pressure to drop noticeably during sustained use like a long shower, then spike back up when the pump restarts. If your pressure feels inconsistent despite a correctly functioning pump, an undersized tank is often the cause.
Glossary
Drawdown
The volume of usable water a pressure tank delivers between pump cycles, measured in gallons. Drawdown begins when the pump shuts off at cut-out pressure and ends when pressure drops to cut-in and the pump restarts. Drawdown is approximately 25 to 30 percent of the tank's total volume rating at standard residential pressure settings, governed by Boyle's Law applied to the air compression ratios at cut-in and cut-out pressures.
Pre-charge
The air pressure inside the tank's air chamber before any water is added, set with the tank completely empty and the pump off. Pre-charge must always be set 2 PSI below the pressure switch cut-in setting. Correct pre-charge maximizes drawdown capacity and ensures the bladder never bottoms out against the tank wall during the low-pressure phase of the cycle.
Cut-in Pressure
The pressure setting at which the pressure switch closes its contacts and starts the pump. Standard residential settings are 20, 30, or 40 PSI. The pump starts every time system pressure drops to this level.
Cut-out Pressure
The pressure setting at which the pressure switch opens its contacts and stops the pump. Standard residential settings are 40, 50, or 60 PSI. The standard differential between cut-in and cut-out is 20 PSI. This differential is important: widening it increases drawdown for a given tank size but should not exceed 20 PSI without verifying with the tank manufacturer that the water chamber can accommodate the expanded volume.
Captive-Air Tank
Industry term for modern bladder and diaphragm pressure tanks that keep air and water physically separated by a rubber membrane. Distinct from conventional or galvanized tanks where air and water are in direct contact.
Waterlogged
A condition in which a pressure tank's bladder or diaphragm has failed, allowing water to fill the tank's air chamber completely. A waterlogged tank provides essentially no drawdown, causing the pump to restart every few seconds and rapidly destroying the pump motor through repeated startup stress.
Boyle's Law
The physical principle governing drawdown calculation: the pressure of a gas is inversely proportional to its volume at constant temperature. Applied to pressure tanks, as water enters and compresses the air cushion (volume decreases), pressure increases proportionally. The Boyle's Law formula for drawdown is: Drawdown = (P1 x V / P2) - (P1 x V / P3), where P1 is pre-charge, P2 is cut-in pressure, P3 is cut-out pressure, and V is total tank volume, all in absolute pressure (gauge pressure + 14.7 PSI at sea level).
Related Guides
Get Expert Well Help
Connect with qualified well professionals in your area. Free quotes, no obligation.